Friday, September 21, 2012

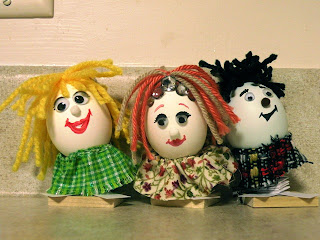
Egg Shell Bobble Heads


Click the Youtube link above if the video isn't working.

Materials for One Bobble:
hollowed egg
yarn
acrylic paint
small googly eyes
small puff ball (nose)
craft glue and/or hot glue gun
scissors
scrap fabric
thread
needle
card stock
1" square of wood or small flat rock (base)

Directions:

1. Hollow the egg if you haven't already. Here is a fun video to try: http://www.youtube.com/watch?v=tFI_rkVbqdQ   My method is similar. Poke holes in each end of the egg with a needle. Swish the needle around to mush up the insides, then clean off the top end.  Blow the insides of the egg out. Rinse by trapping water inside and shaking, then let drain and air-dry.

2. Prepare the scraps of fabric to make them look like doll clothes. For the skirts, Make a rectangle that is longer than the circumference of the egg. Using the needle and thread, gather one side to fit the egg. Connect the ends of the rectangle and glue it to the bottom of the egg shell.  Be creative with the clothes! It is important to leave the bottom of the egg free from clothing, because the spring needs to attach there.

3. Glue on the googly eyes and the nose, making sure to leave enough room for the mouth.

4. Paint the face to add character... eyelashes and lids, lips, etc.

5. Make the hair. The first minute of this video is a great technique: http://www.youtube.com/watch?v=NrAiem37eHs&feature=fvwrel  Once you've made the yarn bundle around your hand and tied a knot at the top, stop the video. You're not making a tassle, so you don't need the second tie around the bundle. It will look like a collection of loops when you remove it from your hand. Cut through the yarn loops, trying to make them all a similar lengths by cutting the center of each loop.

6. Glue the knot of the hair to the egg and arrange the rest how you want it. A small amount of glue near the knot can help hold the styling in place.

7.  Either get a loose spring from a hardware store or make a cardstock spring. I recommend the cardstock version because it is much less complicated.  This video will suffice:  http://www.youtube.com/watch?v=voHi98IcTyQ   However, use a small dab of tacky glue or a permanent gluestick instead of a generic gluestick. Also use cardstock. It will last longer and hold the weight of the shell better.  At the end of the spring, I cut the two strips long to look like feet.

8. Using the hot glue gun, glue one end of the spring to the bottom of the egg and the other end to the 1" base.  Make sure all the steps are dry and pieces are set before bobbling the egg shell.

9.  Enjoy!


Sunday, September 16, 2012

Painted the Wall!


So I picked out three colors that I really like, a light blue and a lighter one and a bright yellow for the accent color. The main wall has the very light blue and then a strip of the light blue begins at the door and ribbons along the sides of the wall that get light from the window. I gave the ribbon an accent color border and five rectangles of white, which are placeholders for future artwork! So I picked out three colors that I really like, a light blue and a lighter one and a bright yellow for the accent color. The main wall has the very light blue and then a strip of the light blue begins at the door and ribbons along the sides of the wall that get light from the window. I gave the ribbon an accent color border and five rectangles of white, which are placeholders for future artwork!
Primer on the window side.


Friday, August 31, 2012

Baby Shoes


Crocheted some baby booties for a friend. She's expecting a little girl any day now. :)


On the baby's feet!

Friday, August 17, 2012

Mums!

Nothing like a splash of yellow to brighten up the front yard! I found some beautiful mums at Lowe's and planted them around the dogwood tree.  Once their blooms open up, it'll be nice and sunny outside our dining window.  Of course, mums are a brilliant part of the fall season, too, so I'm almost prepared for the cooler weather!

Sunday, August 12, 2012

Free-Standing Wall is Built!

Daniel and I actually finished building our wall in two days, which means this post is a bit overdue.  What can I say, though, I'm loving Indy and there's so much to do that i haven't been too interested in my computer :)

Well, the first post left off with the wall still needing drywall, the window, and the door.  We were concerned about the weight of drywall and switched to foam instead. Although it was quite a bit more expensive, we're glad that we did. We don't have to worry about this beautiful rented house shifting any differently than it already is! ...which means no more fallen plaster...

Here is the wall with the shiny layer of foam being installed. We trimmed around the window and door openings to get a clean edge.  The foam was easy to lift and move around, but it is not a forgiving material. For example, if you miss the nail while hammering it in, you're stuck with a circular dent in the wall. We had a lot of fun doing this!

Monica's studio,
with the foam about half-way done.

Looking through to Daniel's side!

Daniel's office with most of the foam installed.
I'm cutting out the foam for the window.
Daniel is cleaning up the edge
before we put in the window.

And the new window is in!
Thanks ReStore for a great window!

The window from Daniel's side.

Daniel's cozy new office, with plenty of light.
The best part of the reflective surface is that
the light never stops. It's very bright in there!

For now, Daniel has decided to keep his walls shiny, but you'll see more of my walls soon. I'll have a mix of painted and shiny wall surfaces. I'm looking forward to picking the colors and a fun theme. This will be the first time I've ever had a chance to be creative with my wall painting scheme!

PS- You'll also see the door installed when I post about my painting.  I just realized that it isn't shown in the pictures.


Monday, August 6, 2012

Ring Bearer Pillow

Made a ring bearer pillow for a couple good friends who are getting married on Saturday. Can't wait for the big day!

I used some pretty lace over satin.  Some beautiful ribbon adds a bow for tying on the rings, and a strap for the 4-yr-old to hold on the back.  Very classy :)